Natural stone cladding Z panels can transform a plain wall into a distinctive architectural feature by introducing genuine mineral colour, irregular texture, natural shadow and three-dimensional depth. Unlike printed tiles or moulded concrete panels, genuine stone cladding is produced from quarried natural stone, meaning that every panel contains its own geological markings, colour variation and surface character.
Z panels can be used to enhance exterior house walls, entrance areas, garden walls, extensions, fireplaces and interior feature walls. Their staggered interlocking shape helps conceal panel joints, allowing the finished surface to resemble individually laid pieces of masonry rather than repeated rectangular tiles.
However, achieving a convincing and durable result requires more than choosing an attractive colour. The stone type, panel construction, wall substrate, installed weight, adhesive system, exposure conditions and corner details must all be considered before installation begins.
Content
What Are Natural Stone Cladding Z Panels?
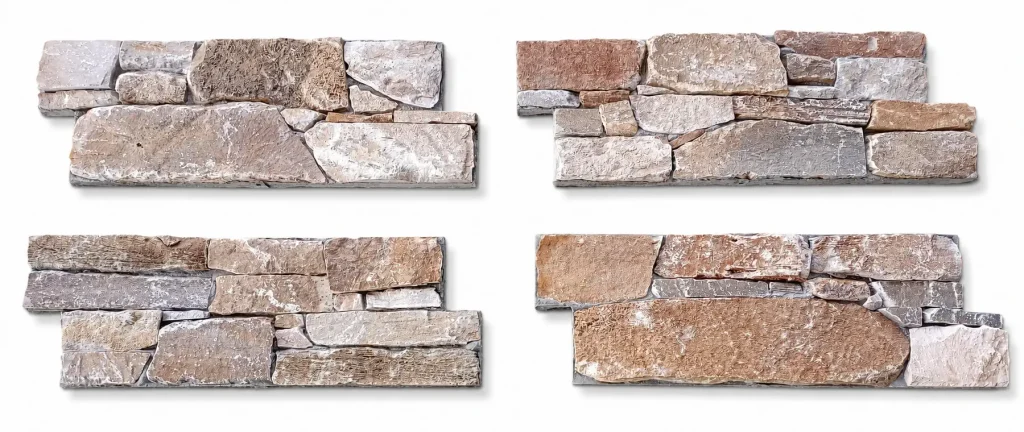
Natural stone cladding Z panels are modular wall panels assembled from strips or pieces of genuine quarried stone. The ends of each panel are staggered rather than straight, creating a shape similar to the letter Z.
When neighbouring panels are fitted together, the interlocking ends interrupt the vertical joints. This reduces the appearance of repeated panel outlines and creates a more continuous natural-stone surface.
The visible stone may be quartzite, slate, granite, sandstone, limestone, marble or another geological material. Depending on the product, the face may be naturally weathered, freshly split, sawn or assembled from a combination of different stone depths.
Homeowners and contractors considering a wall transformation can compare different forms of natural stone wall cladding according to the required appearance, panel weight, backing system and intended application.
How Z Panels Transform a Plain Wall
A flat painted, rendered or blockwork wall can appear visually empty because it has little surface depth. Natural stone Z panels change this by creating several layers of visual interest.
- Projecting stone pieces create natural highlights and shadows.
- Mineral markings introduce colour variation that cannot be exactly reproduced by printed materials.
- Irregular stone depths make the wall appear more substantial.
- Interlocking panel ends help disguise repetitive vertical joints.
- Different lighting conditions change the wall throughout the day.
- Natural edges soften the appearance of modern render, glass and metal.
The transformation can be subtle or dramatic. Pale silver stone can produce a clean contemporary finish, while brown, copper and rust-toned panels can give a building a warmer and more traditional appearance.
Exterior Wall Transformation Ideas
Natural stone cladding does not need to cover an entire building. In many projects, selective use creates a stronger result than applying stone to every elevation.
Entrance walls and porches
Cladding around an entrance can visually separate the doorway from the rest of the building. It works particularly well around recessed entrances, porch columns and sections between windows.
Extensions and garden rooms
A modern rendered extension can sometimes appear disconnected from an older brick or stone property. Introducing natural stone cladding can help connect the new structure with the original building and the surrounding landscape.
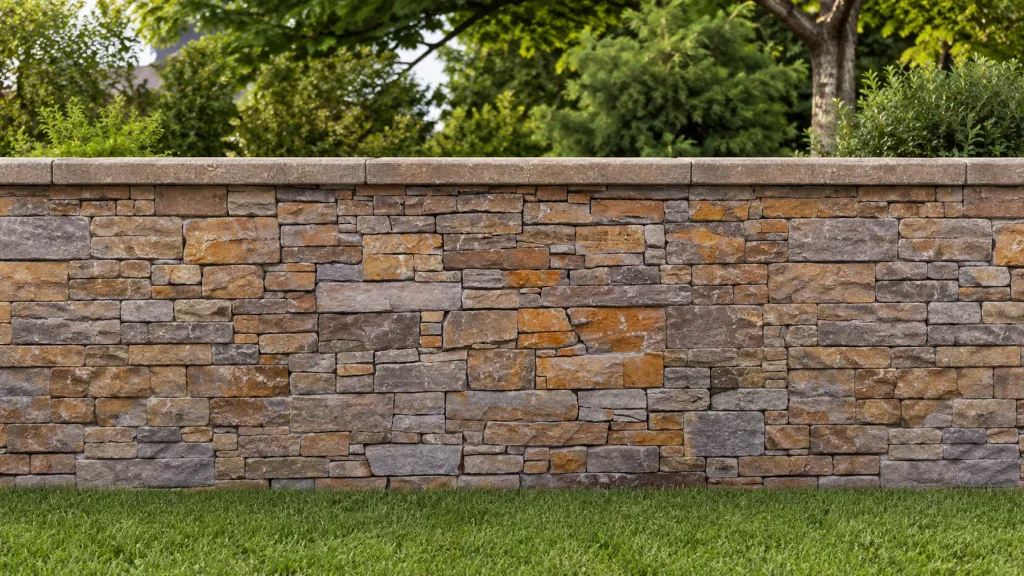
Garden and boundary walls
Concrete block or rendered garden walls can be transformed into substantial-looking landscape features. The stone can also coordinate with paving, planting beds, timber fencing and outdoor kitchens.
Raised beds and outdoor kitchens
Z panels can be used on suitable vertical faces around raised planters, barbecue structures and outdoor preparation areas. Horizontal surfaces must still be protected with correctly designed caps or coping stones to prevent water from entering behind the cladding.
Columns and architectural features
Cladding selected sections of a building, such as columns or chimney projections, can create a focal point without making the entire elevation visually heavy.
Interior Wall Transformation Ideas
Natural stone can also introduce depth and material contrast inside a property. Because Z panels are three-dimensional, the effect is normally strongest where directional lighting can create shadows across the stone face.
- Living-room feature walls
- Television and media walls
- Entrance halls
- Dining-room walls
- Staircase walls
- Chimney breasts
- Fireplace surrounds
- Hotel and restaurant reception areas
Interior installations still require proper structural assessment. Natural stone cladding is much heavier than wallpaper, decorative panels or standard ceramic wall tiles. Standard plasterboard should not automatically be assumed to support the installed load.
Choosing the Right Stone Colour
The stone should be selected as part of the complete property rather than from an isolated product photograph. Brickwork, render, paving, window frames, roofing, fencing and planting can all influence how the finished wall appears.
| Stone colour | Coordinates well with | Typical effect |
|---|---|---|
| Silver or light grey | White render, glass, pale paving and aluminium | Clean and contemporary |
| Charcoal or dark grey | Anthracite frames, dark porcelain and modern architecture | Strong and architectural |
| Brown and copper | Red brick, timber, warm paving and dense planting | Natural and traditional |
| Beige and cream | Buff brick, limestone and neutral render | Light and understated |
| Mixed rust tones | Simple surrounding finishes and restrained landscaping | Highly varied focal feature |
A strongly varied stone may look effective against plain render but overly busy beside multicoloured brickwork. Conversely, a controlled grey stone may suit a minimalist extension but appear too uniform in a rustic garden.
Weathered Stone or Freshly Split Stone?
The character of the finished wall is strongly influenced by how the visible stone face was formed.
| Surface type | Appearance | Suitable design direction |
|---|---|---|
| Naturally weathered face | Aged, irregular and strongly varied | Traditional buildings and rustic garden walls |
| Freshly split face | Sharper ridges and cleaner mineral colours | Modern interiors and contemporary façades |
| Mixed natural face | Strong depth and changing mineral tones | Large feature walls |
| Sawn or controlled face | Flatter and more precise | Minimal architectural designs |
Neither finish is universally better. The correct choice depends on the architecture and on how much natural colour and texture variation the customer wants to see.
Understanding Z-Panel Backing Systems
Two panels may look similar from the front but have very different constructions behind the stone. The backing system affects total weight, flexibility, handling, adhesive selection and substrate requirements.
| Panel construction | Main characteristics | Important consideration |
|---|---|---|
| Mesh-backed stone panels | Individual pieces secured to a reinforcing mesh | Requires full adhesive contact and a stable wall |
| Cement-backed panels | Stone bonded to a rigid cementitious base | Greater total weight and support requirements |
| Individual stone slips | Separate pieces installed one at a time | More flexible detailing but slower installation |
| Interlocking Z panels | Staggered ends disguise panel joints | Courses must remain level and panels must be mixed |
Mesh-backed natural stone cladding can provide a deep natural-stone appearance without adding a complete cement layer behind every panel. However, it must not be treated as a lightweight decorative tile. The stone itself can still impose a substantial load on the supporting wall.
Check the Weight Before Installation
Panel weight is one of the most important technical considerations. A wall covering that appears decorative may place hundreds of kilograms of additional load on the building.
For example, a panel system weighing 65 kg per square metre would add approximately 650 kg of stone to a 10 m² wall. This calculation does not include adhesive, support rails, corner units or other installation components.
Before ordering, confirm:
- The panel weight per square metre
- Whether the quoted weight includes the backing
- The minimum and maximum panel thickness
- The total installation height
- Whether the wall is internal or external
- Whether corners, columns or overhead areas are involved
- Whether mechanical restraint is required
Choose a Suitable Supporting Wall
The substrate must be structurally stable, clean, load-bearing and compatible with the fixing system. A wall that looks visually sound may still be unsuitable for heavy natural stone.
| Substrate | General suitability | Checks required |
|---|---|---|
| Dense concrete | Often suitable | Check curing, contamination, flatness and primer requirements |
| Concrete blockwork | Common supporting surface | Confirm block strength, joints and load capacity |
| Brickwork | Potentially suitable | Check pointing, movement, moisture and loose material |
| Cement render | May provide a suitable fixing face | Confirm render strength, thickness, adhesion and curing |
| Tile-backer board | Suitable only when correctly specified | Check board rating, stud spacing and fixing pattern |
| Standard plasterboard | Should not be assumed suitable | Confirm manufacturer load limits and structural support |
| Painted plaster | Usually requires preparation | Remove weak paint and unsound plaster |
| Timber sheet material | Requires a designed intermediate system | Assess moisture movement and board stability |
Prepare the Wall Correctly
Many wall-cladding failures begin at the substrate rather than in the stone. Loose paint, dust, grease, weak plaster and unstable render can prevent the adhesive from bonding reliably.
Before installation, the contractor should:
- Confirm that the wall can support the complete installed load.
- Remove dust, wallpaper, grease, loose paint and weak material.
- Check the wall for excessive unevenness.
- Confirm the correct primer with the adhesive manufacturer.
- Identify structural movement joints.
- Plan drainage and moisture-control details.
- Establish a level starting line.
- Clean cutting or quarry dust from the backs of the panels.
- Dry arrange panels to assess colour distribution.
- Confirm whether mechanical support is needed.
Select the Correct Adhesive and Fixing System
A general-purpose internal tile adhesive should not automatically be used for heavy exterior stone panels. The adhesive must be compatible with the stone, backing construction, wall substrate, panel weight and exposure conditions.
The specification may need to provide:
- High bond strength
- Vertical slip resistance
- Exterior weather resistance
- Frost resistance
- Moisture resistance
- Deformability for thermal movement
- Compatibility with natural stone
- Continuous support behind the panel
For demanding wall installations, an appropriately classified deformable cementitious adhesive, such as a suitable S1-rated product, may be considered. The exact product should be confirmed by the adhesive manufacturer for the specific panel and substrate.
Mechanical anchors, starter rails or support profiles may also be required for particularly heavy panels, high-level work or exposed exterior elevations. This is a technical design decision and should not be based solely on photographs of other installations.
Set Out the First Course Carefully
The first course controls the alignment of the entire wall. Even a small error at the base can become increasingly noticeable as additional courses are installed.
A temporary support batten or suitable starter profile can be used to establish a straight and level datum. Installation should not begin directly from an uneven patio, floor or wall cap without first creating a controlled starting line.
Mix Panels to Create a Natural Finish
Natural stone panels should be selected from several boxes or crates during installation. Completing one package before opening the next can create concentrated areas of light, dark or heavily marked stone.
A careful installer should:
- Distribute light and dark panels across the wall
- Spread quartz, rust and mineral markings evenly
- Rotate panels where the format allows
- Avoid repeated distinctive pieces
- Prevent continuous vertical joints
- Review the wall regularly from several metres away
The Z-shaped ends help disguise panel joints, but they cannot compensate for poor colour mixing or inaccurate setting out.
Plan Corners Before Installation
External corners strongly influence whether the wall resembles solid masonry or thin applied cladding. Purpose-made corner units usually provide the most convincing result because they continue the visible stone around the return.
Where matching corners are unavailable, the installer may need to form cut returns, mitred edges or a controlled transition into render, timber or metal trim. Corner details should be decided before the main panels are fixed.
Allow for Rain, Frost and Movement
Exterior cladding should not be designed on the assumption that the wall will remain completely dry. Moisture can enter through joints, edges, parapets and openings.
The complete installation should consider:
- Wall caps and coping stones
- Window and door openings
- Structural movement joints
- Changes between wall materials
- Base drainage
- Roof and parapet junctions
- Light fittings, pipes and wall penetrations
- Water shedding from horizontal surfaces
Natural stone cladding should not bridge an existing structural movement joint unless the complete system has been specifically designed to accommodate movement.
Measure the Wall and Add a Waste Allowance
Measure the width and height of the wall to calculate the gross area. Large doors and windows may be deducted, but small openings may not justify a full deduction because cutting and selection produce unavoidable waste.
Wall width × wall height = gross wall area
Gross wall area − major openings = net wall area
Net wall area + cutting allowance = order quantity
| Project type | Suggested additional allowance |
|---|---|
| Simple rectangular wall | Approximately 10% |
| Wall with several windows or doors | Approximately 10–15% |
| Wall with many corners or narrow columns | Approximately 15% or more |
| Strongly varied natural stone | Additional selection allowance may be required |
For example, a wall measuring 5 metres by 2.4 metres has a gross area of 12 m². After deducting a 2 m² opening, the net area is 10 m². Adding 10% gives an approximate order requirement of 11 m².
Ordering the complete quantity at the same time also improves colour continuity because later stock may come from a different quarry section or production batch.
Expect Natural Variation
Genuine stone may contain quartz veins, iron-bearing minerals, colour bands, changing textures and occasional surface fissures. Some stone can also develop rust-coloured markings where naturally occurring iron minerals react with moisture and oxygen.
These geological variations are part of the material rather than artificial defects. Customers requiring absolute colour uniformity may be better suited to a manufactured wall covering.
A physical sample is therefore valuable, although one sample cannot represent every colour or marking that may appear across a complete pallet.
Cleaning and Maintenance
Correctly installed natural stone cladding is generally low maintenance. Exterior walls may gradually collect dust, atmospheric deposits, algae or organic growth, particularly in damp and shaded areas.
Cleaning products must be compatible with the specific geological stone. Strong acids, brick-cleaning chemicals and aggressive pressure washing can damage the stone or weaken the joints.
| Maintenance issue | Recommended approach | Avoid |
|---|---|---|
| Loose dust | Soft brushing or gentle rinsing | Close-range pressure washing |
| Organic growth | Stone-compatible exterior cleaner | Unverified acid or bleach mixtures |
| Rust-coloured markings | Test a suitable stone rust remover on a spare piece | Hydrochloric or brick acid |
| General staining | Identify the stain and stone type first | Using one chemical for every stone |
Common Mistakes to Avoid
- Choosing the stone from one photograph without reviewing a sample
- Ignoring the installed weight of the panels
- Assuming standard plasterboard can support heavy stone
- Using adhesive intended only for lightweight internal tiles
- Fixing over loose paint or weak plaster
- Leaving dust on the backs of the panels
- Installing panels from one box at a time
- Beginning from an uneven floor without a level datum
- Failing to plan external corners
- Bridging structural movement joints
- Using strong acid cleaners
- Ordering the exact measured area without a waste allowance
Transforming Your Wall Successfully
Natural stone cladding Z panels can turn an ordinary wall into a durable architectural feature with genuine mineral colour, three-dimensional texture and changing natural shadow. The interlocking design helps create the appearance of individually laid masonry while making installation more organised than fixing every stone separately.
However, the visual transformation should not be separated from the technical design. Panel weight, backing construction, wall strength, adhesive compatibility, installation height, moisture exposure, movement joints and corner details all influence long-term performance.
The best results are achieved by selecting the stone in relation to the complete property, inspecting a physical sample, confirming the supporting wall, ordering sufficient material and using an installer experienced with heavy natural stone cladding.
When the panels are correctly selected, mixed and installed, natural stone Z cladding can work successfully with brick, render, timber, glass, metal, paving and landscaped surroundings, creating a wall that appears substantial, individual and permanently connected to the architecture.

Melissa Day is a dedicated home blogger who has been blogging for over six years. She covers everything home related. Melissa also loves writing posts about her travels to Europe with her husband and two children.